

TL;DR
Moving your rig into another room or closet is often the best fix for noise. Proper acoustic treatment, ventilation, and placement can turn a small, noisy closet into a quiet, professional-sounding studio space. Foam alone is rarely enough — strategic solutions matter more.
Ever notice how your voice sounds boomy and echoey in a tiny closet? Or how the loud hum of your GPU rig seems to fill the room even when you’re not recording? The secret isn’t just slapping foam on the walls. It’s about smart placement, dampening reflections, and knowing when to just put your rig in another room. This article cuts through the noise and shows you how to turn your cramped closet into a quiet, professional-sounding workspace. Whether you’re recording vocals or just want a peaceful environment, these tips will make your small space work for you, not against you.
Most people start by buying foam or panels. But the real game-changer is moving the rig away from your ears and controlling reflections with simple, effective tricks. Acoustic dampening, placement, and the ‘rig in the closet’ setup. Ready to hear the difference? Let’s dive into the hows and whys of acoustic dampening, placement, and the clever ‘rig in the closet’ setup.
Acoustic dampening
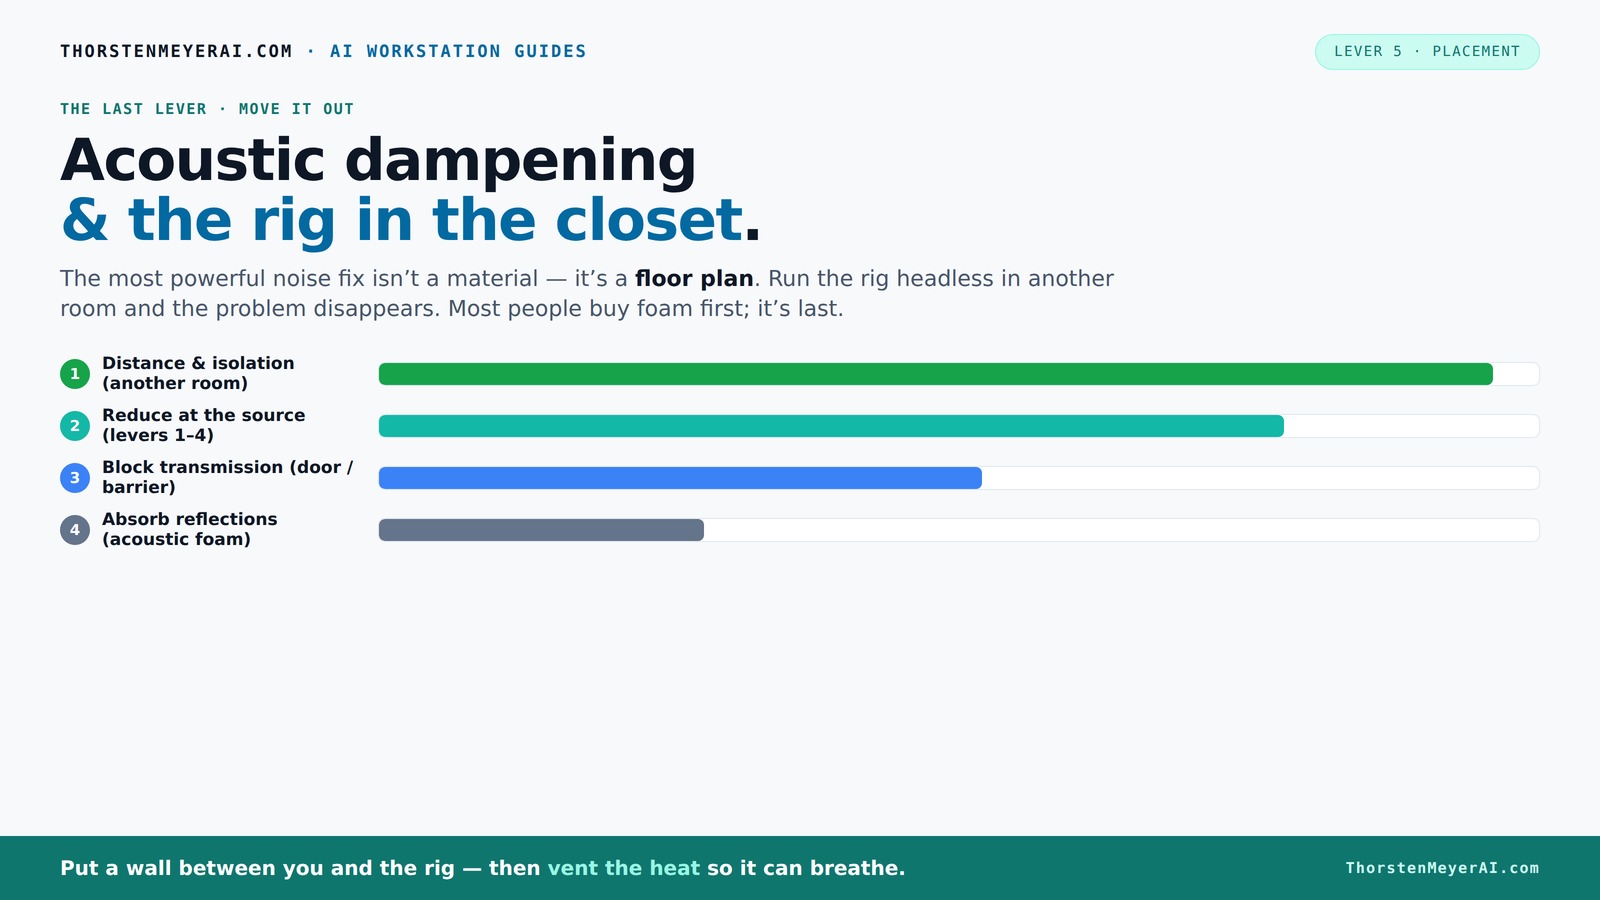
& the rig in the closet.
The most powerful noise fix isn’t a material — it’s a floor plan. A rig you can’t hear because it’s in another room beats any amount of foam. Tap the approaches in Part 1 to see what actually works.
(another room)
(levers 1–4)
(door / barrier)
(acoustic foam)
Contain the noise, not the heat
Key Takeaways
- Moving your rig into another room or closet is often the most effective way to reduce noise. Distance is your best friend.
- Acoustic dampening helps with echo and reflections but doesn’t block sound leaks. Seal gaps and add mass for true soundproofing.
- Mic placement and reflection treatment are critical—treat the reflection points and position the mic carefully.
- More coverage with blankets, foam, or DIY materials reduces echo significantly, especially in small closets.
- Proper ventilation is essential. Don’t trap heat—use vents or quiet fans to keep your rig cool and quiet.

Focusound 52 Pack Acoustic Foam Panels 1" x 12" x 12" Sound Proof Foam Panles Soundproofing Noise Cancelling Wedge Panels for Home Office Recoding Studio with 300PCS Double-Side Adhesive
Soundproofing - Acoustic foam panels triangular grooves structure for better noise absorption, helps to reduce and absorb unwanted...
As an affiliate, we earn on qualifying purchases.
As an affiliate, we earn on qualifying purchases.
Why Acoustic Dampening Doesn’t Mean Soundproofing (And Why That Matters)
Acoustic dampening reduces echo, reverb, and room coloration. It makes your voice sound clearer and less ‘boxy.’ But it doesn’t block sound from escaping the room. That’s soundproofing — sealing gaps, adding mass, and creating barriers.
Understanding this distinction is crucial because many assume that adding foam panels will make their space soundproof. Acoustic dampening, placement, and the 'rig in the closet' setup. In reality, dampening improves the quality of the sound within the room but leaves gaps and thin walls still capable of leaking noise. If you want a truly quiet environment, you need to combine dampening with soundproofing techniques—like sealing gaps, adding mass to walls, or using specialized barriers. The tradeoff is that soundproofing can be more invasive and costly, but it's necessary if you need to prevent sound from disturbing neighbors or other rooms. Choosing the right approach depends on your goals: if you want a clearer recording environment, focus on dampening; if you need silence from outside noise, incorporate soundproofing measures. Both strategies complement each other and, when combined, create a more controlled acoustic space.
Think of dampening as softening the room's echo and reverb—like putting a thick blanket over a hard surface—while soundproofing is about building a wall that sound cannot pass through. For optimal results, understanding and balancing these techniques is key. Poorly executed soundproofing can lead to a false sense of isolation, while over-reliance on dampening alone may leave external noise leaks unaddressed. The best practice is to identify your primary noise sources and address them with a combination of treatments tailored to your specific needs.

Foroomaco Triangular Pyramid Bass Traps for Ceiling Corners, 4 Pack, Black
Purpose-Built for Trihedral Ceiling Corners – Designed for the three-surface junction where two walls meet the ceiling, placing...
As an affiliate, we earn on qualifying purchases.
As an affiliate, we earn on qualifying purchases.
How To Position Your Microphone & Gear for the Cleanest Sound in a Closet
Placement is king. Start by choosing the right spot for your mic—preferably away from walls and corners that cause reflections and bass buildup. Acoustic dampening, placement, and the 'rig in the closet' setup. A typical trick is to position the mic at least 6-12 inches from the wall behind it, angled to minimize sound bouncing into the capsule.
In a small closet, treat the reflection points—these are spots where sound bounces directly back into the mic. Use a mirror to find these points: place a mirror on the wall, and when you see the mic in its reflection, treat that area with foam or soft materials. This ensures that the direct reflections are absorbed before they reach the mic, resulting in a cleaner recording.
For your gear, keep the noisy parts—fans, GPU, hard drives—away from your mic and listening position. Use a separate rack or box if possible. Remember: a quiet, well-placed rig makes a huge difference because unwanted noise and vibrations can be picked up by your mic, degrading your recording quality. Proper placement minimizes the need for excessive post-processing and ensures your recordings are as clear and natural as possible.

Sound Addicted - Studio Monitor Isolation Pads for 5 Inch Monitors, Pair of Two High Density Acoustic Foam which Fits Most Speaker Stands | SMPad 5
SMPad 5 is made out of the highest quality acoustical foam (50kg/m^3 density).
As an affiliate, we earn on qualifying purchases.
As an affiliate, we earn on qualifying purchases.
Treating Your Closet: Cover More Than You Think
In tiny spaces, more coverage beats a few fancy panels. Cover the ceiling, walls, and even the door with blankets, foam, or DIY panels. Acoustic dampening, placement, and the 'rig in the closet' setup. Think of it as throwing a quilt over the room—every soft surface absorbs reflections. The more surfaces you treat, the less sound bounces around, leading to a more controlled environment.
For example, hanging blankets over the door and ceiling can cut the echo dramatically. Use thick, dense materials where possible. If your closet has a hard floor, add a rug or carpet to soak up bouncing sound. It's important to understand that every soft surface acts as an acoustic absorber, and increasing coverage reduces the overall reverberation time, making your recordings sound clearer and more professional.
While it might seem excessive, covering at least 50-60% of reflective surfaces creates a significant improvement. The tradeoff is space and convenience; more treatment can make the space feel cramped but yields better sound quality. The goal is to find a balance where your environment remains functional while maximizing acoustic absorption.

Soundproof Room Divider with Wheels, 72 x 66 Inch Freestanding Room Partition Wall, Portable Temporary Wall, 3 Panel Acoustic Screen, Cubicle Privacy Panels for Office, Study, Classroom (Light Grey)
【Privacy & Focus Support】This room divider panel helps reduce visual interruptions and supports focused work by separating desks...
As an affiliate, we earn on qualifying purchases.
As an affiliate, we earn on qualifying purchases.
Controlling Low Frequencies and Bass Buildup in Small Closets
Low frequencies are the sneakiest. They cause that ‘boomy’ sound that’s hard to tame with foam alone. Acoustic dampening, placement, and the 'rig in the closet' setup. In tight spaces, bass can build up in corners and create a muddy, undefined sound. This buildup occurs because low-end waves tend to reflect and resonate within confined areas, amplifying certain frequencies and diminishing clarity.
Use bass traps or thicker foam panels in the corners to absorb these low end waves. Acoustic dampening, placement, and the 'rig in the closet' setup. Bass traps are designed specifically to target these frequencies, preventing them from bouncing around and causing muddiness. A simple DIY trick is to place a dense pillow or a thick blanket in the corner to help absorb low frequencies; this is a quick, cost-effective solution that can make a noticeable difference. If you’re serious about quality, investing in professional bass traps designed for small rooms will give you more precise control, resulting in tighter, more defined vocals and instrument recordings.
For example, a creator found that adding a bass trap in the closet corner reduced low-end muddiness and made vocals sound tighter and more present.[3] Without addressing bass buildup, your recordings may sound hollow or boomy, regardless of other treatments. Controlling low frequencies is essential for achieving a balanced, professional sound in small spaces.
Ventilation & Heat: Don’t Trap Your Rig & Burn It Out
Placing a hot, powerful rig inside a sealed closet? Bad idea. It traps heat, causing temperatures to rise—and that’s a recipe for throttling and loud fans. The trick is to give your rig breathing room. Without proper ventilation, your hardware can overheat, which not only shortens its lifespan but also causes the fans to ramp up, creating more noise.
Use passive vents, or better yet, install a quiet exhaust fan. Combine this with ducting or a purpose-built soundproof cabinet. This way, hot air leaves efficiently, and your PC stays cool and quiet.[4] Proper airflow management prevents thermal throttling, ensures stable operation, and maintains silence during long sessions. Neglecting ventilation can turn your quiet setup into a noisy, overheating mess, negating all your acoustic efforts.
In practice, I’ve seen DIY setups where a small computer sits in a closet with a vent hole covered by a dense blanket, coupled with a tiny fan. Works surprisingly well, especially if you monitor the temperature regularly. The key is balancing airflow with noise reduction—quiet fans and well-placed vents are your best allies.
The 'Rig in the Closet' Setup: Pros, Cons & How to Do It Right
Putting your rig in a closet sounds simple—close the door, turn it on, and enjoy quiet. But the catch? Heat buildup and airflow. Do it right, and you’ll have a quiet, cool, and effective workstation.
Use a vented enclosure or a purpose-built soundproof cabinet with active cooling. Seal gaps around the door with weatherstripping or a dense curtain. Keep the cables organized and avoid vibration transfer by using rubber feet or anti-vibration pads.[2][4] The main challenge is balancing noise reduction with proper heat dissipation. Poor ventilation can lead to overheating, which not only reduces your hardware’s lifespan but can also cause noise from cooling fans ramping up. When done correctly, a closet rig can be a highly effective solution, but it requires planning around both sound and thermal management.
Many creators have turned small closets into DIY studios—just remember, ventilation is king. Without it, your rig will cook itself, and all your efforts go to waste. Invest in a good venting system and consider active cooling options to ensure your setup remains both quiet and cool.
Quick Guide: 5 Steps to a Quiet, Cool Closet Rig
- Choose a well-ventilated closet with a door you can seal or cover.
- Place your PC or rig on anti-vibration pads, away from walls.
- Seal gaps around the door with weatherstripping or add a soundproof curtain.
- Install a quiet exhaust fan or vent to remove heat.
- Cover reflective surfaces with blankets or foam, especially behind the mic and around the ceiling.
Frequently Asked Questions
Is acoustic dampening the same as soundproofing?
No, acoustic dampening reduces echo and reflections inside a room, making the sound clearer. Soundproofing blocks sound from leaking out or in, requiring mass and sealing gaps. Both are important but serve different purposes.Where should I place the microphone in a closet booth?
Position the mic about 6-12 inches from your mouth, away from walls and reflective surfaces. Aim it slightly off-center from the wall behind you, and treat reflection points with foam or blankets.How much acoustic treatment do I need in a small closet?
Cover at least 50-60% of reflective surfaces—walls, ceiling, door—to significantly reduce echo. Use blankets, foam, or DIY panels to fill in the gaps, especially around reflection points.Do bass traps matter in a closet this small?
Yes, low frequencies tend to build up in corners, causing boomy sound. Use bass traps or DIY solutions like dense pillows in corners for tighter, clearer vocals. Addressing bass buildup prevents muddiness and ensures a balanced sound profile.Can blankets work as well as acoustic panels?
Blankets and thick curtains absorb sound reflections effectively, especially in small spaces. While not a perfect substitute for professional panels, they’re a cheap, quick solution that significantly reduces echo and improves sound clarity.Conclusion
Quiet, professional sound in a tiny closet isn’t magic — it’s about strategic placement, effective dampening, and smart ventilation. Moving your rig into another room or a well-ventilated closet can save you from endless echoes and overheating. Remember: your space’s true secret isn’t just foam; it’s how you treat the room and position your gear.
So, next time you think about acoustic treatment, ask yourself: 'Am I just muffling sound, or am I stopping it from leaking?' The answer determines whether your closet becomes a quiet sanctuary or a chaotic echo chamber.